I Built a New Closet

We replace the nasty stained brown carpet upstairs with maple hardwood flooring, and in the process had to remove the closet system that was in the master bedroom’s closet. Once we had removed it parts of it fell apart due to age/stress/fiberboard construction, etc… We decided the we didn’t want to put it back in.

We’d gotten an estimate from California Closets a while ago, but it was for close to eight grand, and that’s for a small closet. While their stuff looked decent, it was actually built with MDF not hardwood, and I couldn’t see paying that kind of money for pre-fabbed MDF.

So I decided to build it myself. I sat down with Emma and got her to layout what she wanted as far as shelving and hanging space. It actually turned out to be pretty simple. We have a nice dresser in the bedroom, so we didn’t need any drawers in the closet. We also didn’t need much shelving, just mostly hanging space, and some area to put shoes and a few small boxes (shoe shine kit, etc…). I drew out scaled blueprints and figured out the sizes and quantities of the cut wood I’d need, and then worked out the raw wood requirements from there.

At that point I tried to go to the local lumberyard, which is just down the street, however they don’t carry hardwood ply, which I wanted to use in a few places, so I found a lumberyard in Watertown which carried everything I wanted, and did next day delivery which was fantastic.

Keep in mind, before this the only thing I’ve really built was the woodshed, which while it does hold wood, and survived the winter perfectly, is not exactly a thing of beauty. Not all of it’s angles are 90 degrees, and it’s mostly just 2x4s and nails. So this was my first indoor quality wood working project.

I had to buy a few tools: router, jigsaw, new blades for my skill saw, clamps, googles, etc… My mother had her old table saw in storage, so we pulled that out and took it from Vermont down to our house. Unfortunately a missing fence, and a missing special blade changing wrench meant I wasn’t able to use it, and had to use the skill saw for 95% of the cuts, often using a 2×4 clamped down as a rough fence.

Lessons Learned:

  • Everything takes longer than you expect.
  • No floor, wall, or ceiling is actually straight and even, so you have to measure everything, no matter how good your paper plans are.
  • Having a table saw would be really nice and save a lot of time.
  • Don’t order materials when you’re tired. I now have 750 FEET of maple edging, instead of 750 inches.
  • 1″ hardwood and 3/4″ hardwood ply is heavy stuff to run up and down stairs all day.

I actually had a REALLY good time during the process and am annoyingly pleased with and proud of the results. So I’m buying a table saw and building a custom office desk and shelving, and then making some awesome bookshelves for the library, and then….. :)

The closet is maple and maple ply, with cedar flooring, and stainless steel hardware.

[fusion_builder_container hundred_percent=”yes” overflow=”visible”][fusion_builder_row][fusion_builder_column type=”1_1″ background_position=”left top” background_color=”” border_size=”” border_color=”” border_style=”solid” spacing=”yes” background_image=”” background_repeat=”no-repeat” padding=”” margin_top=”0px” margin_bottom=”0px” class=”” id=”” animation_type=”” animation_speed=”0.3″ animation_direction=”left” hide_on_mobile=”no” center_content=”no” min_height=”none”]
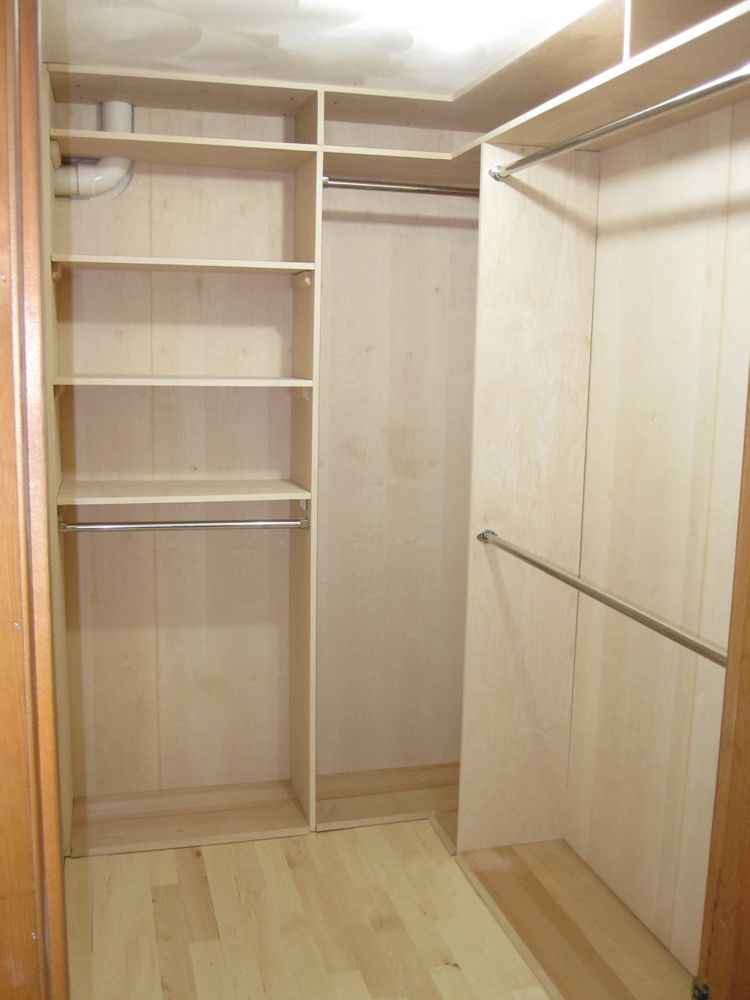
The Closet I Built!
The Closet I Built!
[/fusion_builder_column][/fusion_builder_row][/fusion_builder_container]


Posted

in

by

Tags:

Comments

12 responses to “I Built a New Closet”

  1. bw Avatar
    bw

    that is why going with some where like CC’s saves you so much time and energy that you don’t need to go out and purchase equipment. You can tell designers to change their designs to be exactly what you want and then they can suggest what is good or what is “bad design”. People don’t understand that there is a lot more to a closet and then waste their money doing it themselves to see a year or two later they could have done it right. Always pay more upfront for great quality and service and in the end it will save you. Your pictures are an ok design but if you had gone to a pro you’d have a better product, design and the structure of the system would be set up better.

    1. Devon Avatar

      While I definitely can respect anyone who wants to go with CC or the like, I have to disagree, at least in my case.

      The equipment cost was low, and having it will allow me to build the shelving, custom desks, custom bookshelves, garage workspace, reinforce the back outside stairs, stabilize the deck, and all the other things that I’ll need to do over the next 20 years of owning a home.

      The materials for this project cost less than 1/8th of the CC quote. The project was done in days, instead of waiting for over a month like CC. The materials are MUCH nicer than the laminated MDF that CC uses. We did get a design done by CC, but I think the design I ended up building suits our personal needs much better. You can’t get them to change their designs to be exactly what you need, since they’re using pre-fab components, so the available sizes, depths, spacing, etc.. is quite limited. I also personally HATE the verticals that have tons of pre-drilled holes into the MDF and the little shelf holder things. I think that looks cheap and they tend to not last or be as solid as hardwood construction.

      And honestly if I decide I want to change the design, I can build EIGHT of these over the next few years, for the same cost as one MDF pre-fab from CC.

      If you don’t feel like tackling a project like this, I’d recommend getting a quote from a local cabinet maker before you go with CC or the like. Truly custom, real wood, etc.. and likely cheaper that CC.

      If you want to go with CC, that’s totally fine with me, but even ignoring the insane cost, I’m happier with the materials, layout, strength, and fit of what I have than anything the CC folks showed me.

  2. jasmine Avatar
    jasmine

    I am inordinately impressed by your Closet Construction abilities. I think that paying 8 grand for a pre-fab closet system, made from inferior material would be stupid since you obviously have the capabilities to do it yourself. Additionally, I think that the fact that the first response to your blog is negative, and obviously from someone in the employ of California Closets, is just pathetic. There are hundreds (thousands?) of people who need the services of companies such as that, you, however are not one. Great Job!

  3. Emma Avatar

    Awesome job Devon! This is gonna be perfect for us & its so nice and open now.

    Yeah, one of the reasons why we decided to do it ourselves is because we weren’t super impressed with CC’s design. It felt really cramped, and they added a bunch of stuff that we didn’t have much use for. (in addition to the cost being jawdroppingly expensive for inferior materials). I’m all about paying more for high quality stuff, but I think we got a way better closet DIYing. Also, the comment from BW really makes me think twice about California Closet’s “marketing tactics”. If that’s how they operate, I really have no interest in ever giving them any business.

  4. Pete Avatar
    Pete

    I had one closet done by California Closets and another one done by a carpenter. The CC closet looks nice aesthetically and is fuctional but I would NOT repeat a job with them for the following reasons:

    – They use particle board of a quality similar to the boards found cheaply at Home Depot. Particle board is what is swept up off the floor when wood workers are working on REAL wood. It is a cheap by product. A subsititute that has been sold to many people as the best thing around when in reality there is nothing like Real Solid Wood.
    – Paper thin layer of melamine is prone to damage each time you unscrew shelf holder or screws to relocate a shelf. The melamine is applied industrially by machine and the shelf edges are IRONED on. Again, this is bottom of the barrel construction.
    – Don’t even think about having the CC closet exposed to water or a high moisture environment. You will end up with a closet ffull of mold and sagging cardboard.
    – Yes – I also hated the pre-drilled holes from top to bottom of both sides of the cheap vertical panels that hold the shelves.
    – Yes – They use cheap metal pegs to hold the shelves which result in the shelves shifting slightly evertime you place or remove an object. Not to mention that once in a while the entire shelf just drops out. They should have provided grooves to fix the shelves and prevent this. Poor design.
    – The CC closets DO NOT include a back covering so you better make sure the walls are in pristine condition and painted prior to installation. You will see the walls in the background. Painting after the fact is a challenge. My advice – Use satin paint to allow for easy wipe cleanup over the years.
    – I noticed that because the CC closets are made of particle board they design the systems in such a way that they raise the entire closet ensamble up off the floor by at least 6 inches. I assumed this was to prevent possible water damage. You lose an awful lotta space in this little hidden design feature that they use.
    – CC closets are pre-designed. In other words all they do is cut it to fit you needs. They will not do extra wide or deep shelves. they so not do corners efficiently since everything is square. No L-shapes here.
    – There is no doubt in my mind that they are way overpriced. You are basically paying for the custom fit/design and installation. Material costs are dirt cheap when you use particle board laminated with a paper thin layer of melamine. I cannot even begin to imagine the profit they made on a $3000 walk-in closet of simple shelving. By the way, this was my wifes project and she covered the costs so it was less painful to me.
    – At the end of the installation, my CC closet smelled like plastic and glue. No wood smell whatsoever.

    The Carpenter Made Closet was at a much more reasonable price when you value actual work by a human being versus that of a machine. It was far superior in materials. And the closet smelled like wood……ahhhhh. The Carpenter Made Closet had fine finishing details with solid non-shifting shelves, integrated L-shapes in the corners, etc.

    My next closet (my daughters) will be MY DIY Project…wish me luck….

    I’ll post some pics of all three next time round…

    1. Devon Avatar

      Awesome! So far the closet I made is working out great! It holds more stuff than our old one is just great! I should get some pictures of it all full of clothes and shoes.

      Best of luck with your daughter’s closet!

  5. Pete Avatar
    Pete

    Btw – Nice closet Devon !

  6. Tim Avatar
    Tim

    I’m glad you posted a picture of this. I’ve been searching for designs for our closet since the wire racks have fallen once again. This is just about perfect for what I’m going to do. Good job.

  7. closet designer Avatar

    You did a really nice job and I like the maple veneer instead of the usual “do it yourself” materials out there. I design closets but would never try to install them.

  8. Greg Payette Avatar

    Hi, it looks like it’s been a little over a year since you built your closet. (Nice, by the way.)

    How’s it holding up? Any issues or things you might have done differently in hind-sight?

    Also wondering what you used to tie the materials together? Any chance it was the Kreg Pocket Hole system? If not, next time gotta try that.

    Good luck.

    Greg

    1. Devon Avatar

      Closet is holding up great! I just used sheetrock screws:) The one thing I figured out 1/2 way through, and wish I’d started with it first is to pre-drill holes for the screw heads to sink into the wood below the surface so they can be seamlessly puttied over.

  9. […] can add your own basic wood shelves, build a custom wood closet from scratch, install wire closets, hang “track” products where you simply hang vertical strips and clip on […]

Leave a Reply

Your email address will not be published. Required fields are marked *

PHP Code Snippets Powered By : XYZScripts.com